Actually not a hole, but multiple cracks. One of my hobbies is amateur luthiery. I have an affinity for stringed instruments of all kinds.
Recently I acquired a Harmony Monterey archtop guitar. Model H1457
 It likely dates from between ’52 and ’55 and needs a little bit of repair. Someone stumbled into the back of it many years ago and it has been languishing in a state of disrepair ever since. What is nice about it is that it has all solid woods construction. It has a Spruce top with no cracks or splits, Maple sides, and birdseye Maple Back. The H1457’s were made between 1952 and 1962 and sold for under $100 at the time. As you can see, the back has several splits and was coming loose from the lower bout on both sides of the Tail Block.
The next step was removing the back. Carefully I removed the binding, the plastic strip that covers the joint between the back and sides of the instrument.
Then I used a thin pallet knife and carefully and slowly worked my way around the sides from the two main splits near the tail block towards the neck joint heel block. Fortunately this guitar was glued using Hide glue which is made from animal hides(probably cow) which are boiled down into a brown goo. Had it been glued with
conventional wood glue, it would have 
been a much harder task to remove the back without causing some serious damage.
Having removed the back, I inspected the underside of the top for any telltale splits or other defects.
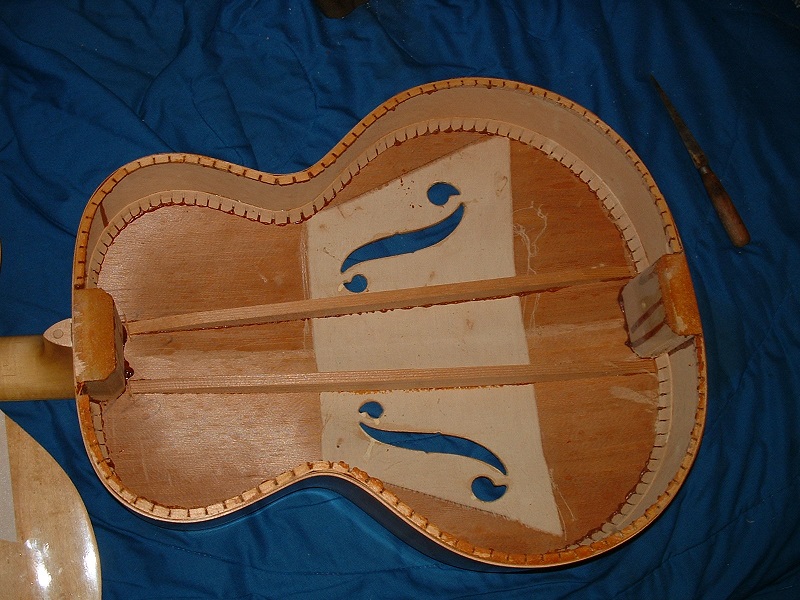 I did find that the Tail block had become loose from the top so I will have to re-glue that before replacing the back once I get all of the cracks repaired. The whiter trapezoidal area covering the f-holes is a very thin fabric, possibly linen, which is glued in place on the underside of the top. Its’ purpose is to arrest any development of cracks or splitting of the Spruce top from the areas of the f-hole cutouts. While most flat-top guitars have fan or x-bracing on the underside of their tops, this archtop has only two main strut supports that run longitudinally from Neck-Heel to Tail.
The back looked like it had only about four bad splits, but it turns out to have a total of seven cracks or splits that need to be re-glued. What I’m calling ‘cracks’ run all the way to the edges of the back, there are four of those. Splits are ‘cracks’ that are contained within the back and do not terminate at an edge, there are three. I will not be using the Hide glue for fixing these. I will use a good wood glue like Titebond II. It will hold up much better through environmental changes and stress that will be subjected to this guitar once it is re-strung. In addition, I will glue little diamond shaped wooden cleats with their grain running perpendicular across the grain of the splits and cracks on the underside of the back. These will stabilize and deter any likelihood of the cracks and splits redeveloping.
Once the Back is repaired and the Tail block is re-glued, then I will glue the back using Titebond Liquid Hide Glue, a modernized version of standard hide glue that has advantages of a longer setup(working) time, as well as facilitating easy back removal, should that ever again be needed.
I will give an update or a new post when this project gets completed, so for now I leave you with :
Update Tuesday Evening 08/25/2015
Since the Back of the guitar is not as important a resonating surface as the Spruce top, I decided to dispense with using smaller mass diamond shaped glue cleats across the cracks.
I had a bag of short popsicle sticks that are commonly used for making confections with a handle, you know, chocolates, small lollipops, etc., or sold as a craft item. The wood is nice and thin and sturdy enough for my needs. I’m not too sure what wood is used, but a few sites say that popsicle sticks are made out of white birch, which is resistant to breaking and usually doesn’t splinter into sharp and dangerous pieces. Perfect for my need as even shorter segments would be less likely to break.
I beveled the top ends of the pieces mainly for ease of handling and smoothing off the saw burrs of the cut ends, and also because it looks a little more professional.

The cleats in the center cover a major split and that is why I bunched the cleats touching each other the full length of the split. This was probably the hardest one to repair. I first worked a generous amount of Titebond II into the split from both sides. Then I used an adjustable strap to close the gap, but since that was bowing the top and opening the split on the outside surface, I had to turn it over so the inside was facing down and place weights on the outside surface to close the split firmly while the glue set. I used some wax paper on top of the split joint, and set some books on top of that to get the best weight for the smoothest alignment of the edges of the split. [The cleats were added later, after the glue in the split was dry.]
I used a similar procedure for the remaining cracks that extended to the ends of the upper and lower bouts. Only instead of using a strap, I used a pipe clamp to close the cracks, and steel weights to ensure even closure on the outside and inside of the back. It’s as if each crack/split repair was an experiment in itself.

Since the Back panel of the guitar is not a simple flat piece of wood, but bulges up from the edges toward the center, the repairing of cracks becomes a delicate balancing act of side force vs. down force. Only some minor touch up remains for the outside surface. Compare the picture above to the second one at the top of this post.
You can hardly tell from this photo that the back once had such major damage!
The next step will be to re-glue the Tail Block to the spruce top, and then prep the mating surfaces for re-attaching the Back. After that I will assess what I need to do to revitalize the finish, replace the tuners, and properly re-attach the original pickguard.
~~~~~~~~~~~~~~~~~~~~~~~~~~~~~~~~~~~~~~~~~~~~~~~~~~~~~~~~~~~~~~~~~~~~~~~
Final Update! Repairs Completed.
I’m a little late on posting this, but the Monterey repairs are now complete. Finish touch-up on the Top and Back, Replaced vital pickguard hardware, New Sealed-Tuners, New Nut.
Set-up was a little trickey, needed to shim up the Nut, and shave down(sanded) the bridge in order to achieve the desired fretting action with plenty of room for raising the action, if desired.
Here are some pics of the finished repair:


